Friday, 31 May 2013

Lehria Nail Art


Grooming your nails is an indispensable need for you nowadays!!! 

With the onset of newer trends, keeping up your looks becomes mandatory for you. Obviously you don’t want to be old school while everyone else looks cool!!!

Flaunting a new look for the nails is quite tricky when you have already done a lot of nail arts. You can’t afford to repeat anyone of those as it may attract sarcastic comments from the viewers. At this stage when you’re craving for a new design which is not only different but also suits your nails best for the occasion. Even if you find a new design which doesn’t suit your dress code, then the nail art would be done for nothing.

Nail art Designs
Lehria Nail Art


A peaceful color combination with a gripping design completes a elegant nail art!!! For those who are tired of the frequently repeated patterns in designs, here’s something different.

Exclusively for you the new Lehria Nail Art!!! This nail art gives your nails a lavishing streak of style along with a relaxing color combo.

Procedure to apply this art:

Cover your nails with a white base coat, keeping the surrounding skin areas covered with a cello tape. Take cello tape strips of small widths and place them horizontally parallel to each other on your nail.

Put two swipes of a glowing color vertically on two sides of the nail leaving a gap between the two swipes. Orange color is preferred. You can choose any other color combination if you want.

Fill the left out gap with dark green nail paint. This gives an alternate-striped pattern. Let it dry.

Remove the tapes on the nail as well as those covering the surrounding skin areas. Do it carefully otherwise it may disturb the design.

Use stones to make your nail art look even more sparkling and gorgeous. Then apply a transparent coat to save your design and shield it externally. 

Watch this video tutorial:


With all of this done, you’re ready with the Lehria Nail Art!!! A never before seen design will now be on your nails!!! Try this and flaunt a pleasantly surprising look for every occasion!!!

Funny Faces Nail Art Design

What is life without fun? Fun and humour is something that describes a gleeful and happy mood. It’s our nature to wear clothes that match our mood. 

But why limit it to just clothing, why not try something that is more stylish and fun! When you think about it, what could be better to describe your mood than a cute and chic nail art? Nail arts with funny faces are ultra stylish and they are just too cute! There are many designs that you can choose from. To name a few, you can try Panda Nail Art or Sponge Bob Nail Art. Or you can set your imagination free and create something new and cool on your own.


If you are a beginner but crave for stylish nails, this could be a perfect start to the nail art world.The best thing about these designs is that they are very simple to apply and yet look so trendy and hip. 

For how to get one on your fingertips, you need to follow these instructions:

For base coat you have to choose a bright colour. Pearl sheen will be a great choice. You can even add more glamour to your design by applying two colours alternatively on the nails. Red and pink are great for these mood teasers. 

If you want to draw pandas on your nails, you need to draw a circle at the top of your nails using white paint.

Then create eyes and mouth of the panda with a toothpick. Make two black dots at centre of the circle and put two smaller white dots inside the black ones. Draw the ears at the top of the circle. That’s it! You have your cute little pandas ready.

Now that you have got an idea of how to make shapes on your nails, you can try other funny face designs like Sponge Bob toon characters. You just have to draw the eyes, nose and moustaches. You can add big teeth for more humour.

Watch this video to ease your learning:


You can try different colour combinations and mix-n-match style. Just remember to go for bright and happy colours. 

You have numerous design options and the creative flexibility too. You can flaunt your artistic nails and set the right mood for the day. What are you waiting for girls, get your favourite funny faces and toons on your fingertips and sport a new look!

Wednesday, 29 May 2013

Canvas Shoe Nail Art


Flaunting the same natural designs in your nail art is quite boring and no longer fits into the new trends. It’s time to do something never seen before!!! 

It’s the habit of many ladies to keep on changing the style of footwear with the outfits and fashion. High-heel footwear suits the party look whereas shiny leather shoes go best with formal dressing. A funky pair of canvas shoes goes well with almost all dress codes.


Canvas shoes are one of the most popular styles of shoes one likes to wear. These have the combo of distinct shape and a catchy mixture of colors which results in an attractive overall design.


Now you can have the impressive design of canvas shoes on your nails!!! Bringing to you a new cheerful way to groom your nails i.e. The Canvas Shoe Nail Art!!! This nail art, being a mixture of a blissful combination of colors and an incomparable design, gives you the best looks no matter what the occasion is.

Procedure to apply this nail art:

Start with a red base coat. You can choose any other color if you want. After applying two coats of it, let it dry. Then make white French tips using a fine brush.

After the French tips have completely dried, draw a black arc inside them.

Make six silver colored dots vertically using a toothpick three on left side and three on the right side. These resemble the eyelets of the canvas shoes. Use a brush to join these dots so that you get the shape of shoe laces. 

You can also add small loops in the centre so that the shoelaces appear to be tied in a knot.

Wait for the designs to dry completely. Once they’re dry, apply a transparent coat. It will save your design, shield it from dirt and add some extra shine and gleam to your nails.

Watch this video to learn more:


Now you’re done with this marvelous nail art!!!

Feels good to have the look of fashion accessories on your nails, doesn’t it? You   can also apply this nail art by altering the design a bit so that a different style of shoes can show up on your nails 

Monday, 27 May 2013

Galaxy Nail Art


Grooming nails is one of the most frequent practices of ladies throughout the week!!!

Starting from applying an ordinary nail polish of single color, the fashion of nail-grooming has brought about the trend of nail arts...

Nail art is one of the most artistic practices in self-grooming prospect. Earlier people used to rely on makeup experts and beauticians for getting a new look of nails. But today there are so many products available in the fashion market. You can simply bring home a set of those products and prepare a nail art for yourself. 

Nail art designs
Galaxy Nail Art


Flaunting a nail art has become even more popular due to the advent of new designs!!!

Design is the primary aspect when you consider nail art. Choosing an appropriate design for a particular occasion may take from a few seconds to many minutes. The reason for this is the availability of several designs. 

The sky looks exceptionally brilliant in the night, doesn’t it? What if you could show the same look on your nails?
Just for you the new Galaxy Nail Art!!! This is one of the most innovative forms of nail art which gives your nails a magnificent look with a royal color combination and a sensational design resembling the galactic space.


Procedure to apply this nail art:

Start with a royal blue base coat. Apply it on all your nails and wait for it to get dry completely.

After your base is dry, take a sponge and add a swipe of red color on it. Dab the sponge on your nails. This will give a gradient look. Do the same again, taking swipes of golden brown, purple and orange color on the sponge, one by one.

For a sparkling look, apply some glue glitter on your nails using a brush. This will not only make your nails look glossy but also add a bit of shine to them.

Now add glitters and rhinestones to your nails. Better keep the rhinestones scarred so that they perfectly resemble stars.

Now apply a transparent coat to save your design. Besides giving additional shine, this coat will keep your design shielded from dust and prevent it from wearing off too early.

Watch this video tutorial:


That’s it!! Now you’re done with your Galaxy Nail Art. There is no doubt that you fancy the look of the night sky. Who doesn’t? The midnight dark sky with infinite stars!!! Fascinating, isn’t it? Get the same dazzling look on your nails with this art!!! It blends in with any dress code.   

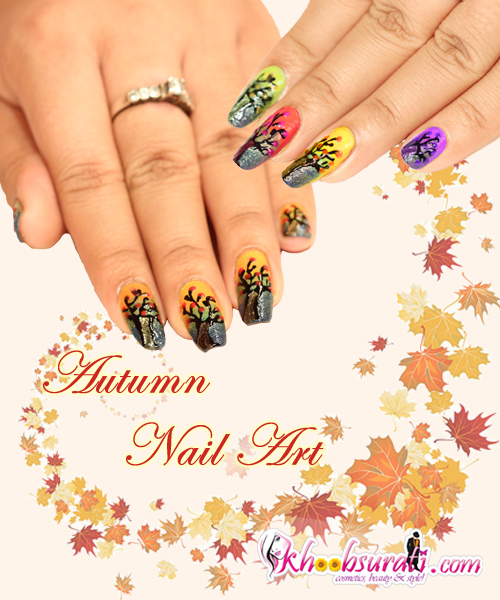
Autumn Nail Art


There is always an excuse for you to modify your style!!!

Fashion is just like wind!!! It changes its course unconditionally anytime. With the rapidly changing trends, moving on with the latest looks becomes a necessity for you. No matter how often you go out on a party or any other occasion, you have always wanted to go with a different look for all those occasions. The reason for which you’re going out decides your hairstyle, footwear and accessories. However it’s not so easy to decide a new design for your nail art when the occasions are too frequent. In such a situation, you may end up going to two different venues with the same nail art.

Nail Art Designs
Autumn Nail Art


Nail art designs not only signify a particular occasion, but also a season. Now you can apply a nail art whose design beautifully depicts the season. Now get the pleasantness of autumn on your nails!!!

Exclusively for you the new Autumn Nail Art!!! Show the beauty of the autumn through your nail art.

Procedure to apply this art:

Apply an orange colored base coat on your nails, swipe blue color using a sponge and dab it on     your nails. Wait for it to dry completely.

Then do the same with green and yellow color consecutively, allowing each of them to dry.

Make a fine tree with protruding branches using black nail paint. The drawing of the tree should be neat and should resemble a tree in autumn with the leaves falling down.

Draw red dots at the ends of the branches to represent the leaves.

Use a fine brush to add golden color at the base of the nail and separate this portion using black lines. This further adds neatness to the look.

Dip a cotton bud in nail-paint remover. Use it to wipe off the extra color on the edges and the corners.

Check out this video to learn more:


This awesome nail art allows you look seasonally stylish as well as sensational with the beauty of natural colors and a catchy design. Try this trick and you can flaunt an attractive look for the season!!! 

Check Khoobsurati for getting Nail Art related sources that will help you in doing these Nail Arts

Thursday, 23 May 2013

Leopard Print Nail Art


Nail arts have now become one of the most impressive factors to define a style statement. Be it your dress, footwear, accessories or your nail art, you feel a bit awkward to repeat it. It feels embarrassing when somebody points out that you’re wearing the same thing, doesn’t it? The same is the case with your nail arts.

Every design looks exceptional when you use it for the first time. 

It makes its impression on the people around. Once it has been seen, it becomes familiar. The next time it won’t attract compliments like the way it did before. Instead people will assume you don’t know how to apply any other nail art. Fearing this, you always look for a new design for the next occasion.

Leopard Nail Art


Nature holds great beauty. Be it the flora or the fauna, it always gives a pleasing look. Some wild animals though very ferocious in nature, have an amazingly brilliant physical appearance. Be it a tiger or the black-striped white color of a zebra, the magnificent look always enchants you.

It’s your turn to flaunt a similar wild look on your nails!!! Bringing to you the new Leopard Print Nail Art!!! With this nail art, you can get the same beautiful pattern as that on the body of a leopard.

Procedure to apply this art:

Apply a light brown shade with golden sheen color as the base coat. This adds some glamour and shine to your nails.

Randomly draw black c-shaped curves all over your nail in such a manner that no two curves intersect each other.

Fill the curves with dots of chocolate color. Use the chocolate color nail paint along with a toothpick so as to make neater dots. Do the same with other nails.

After the designs are completely dry, apply a coat of transparent nail enamel to save the designs. This coat gives your nails a glossy look and at the same time protects them externally.


With all of the above done, you’re finished with the Leopard Print Nail Art. Try this aesthetic nail art and let your nails state your style with a wild streak!!!

Bridal Nail Art


Marriage- the purest relationship of a lifetime! 

With marriage, a lot of functions and ceremonies accompany. And, a lot of attention on you, the bride! You sure do want to look your best at all times. When it comes to designing it yourself, it is always confusing.

Here’s a simple, yet gorgeous bridal nail art. This design features bright colours with some silver on it for a lovely contrasting bridal design. This design adds a festive touch to complete your look for the wedding. 

Nail Art designs
Bridal nail Art

How to design this Bridal Nail Art:

Before we start, make sure your nails are perfectly shaped, filed & buffed.

Now, apply a base coat on top of the nails. Use red polish as the base coat. Red colour refines the wedding look and is traditional for Indian weddings.

Apply blue polish to create a French tip. It should be diagonal in shape.

We will use rhinestones to design a studded flower at one side of your nail. Use a toothpick or wood stick to place the rhinestones. You have to be careful while doing this and you will get a lovely flower design.

After this, use a dotting tool to add silver colour dots adjacent to the studded flower. If you don’t have a dotting tool, use a toothpick.

Shape the dots beautifully in an abstract curve or tribal design to raise the glam quotient.

Now, the final touch! Use silver polish to create diagonal lines on the blue French tip. Use a fine brush to create the lines, otherwise it will get smudgy.

Crisscross these diagonal lines to get an amazing touch to the design.

Repeat the procedure with all the nails. Apply a transparent top coat to give the design a perfect finish.


See, wasn’t that easy? Now, go ahead and try it out. 


Special Tips:


  • You can use any other colour for the tip, but it must a bright one. 
  • Remember, the colour should create a contrast. 
  • Use a black dot for the centre of the flower.


This is an ultra glamorous & easy nail art, perfect for wedding. Ladies, it’s your wedding, everything needs to be perfect! Before you get wed in the holy matrimony, don’t miss any chance to flaunt your nail art.


Tuesday, 21 May 2013

How to do Stamping Nail Art???

Fashion often changes its course, doesn’t it? You always try to keep up with the trend and change your style and appearance according to the latest fashion. Your looks for any particular occasion make a style statement with hairstyle, make-up, dressing sense, footwear, nails and lots more. The appearance and shape of your nails holds a priority as you shake hands with many people revealing your nail color. You can’t simply color your nails with ordinary nail polish to flaunt a new look in this era of fashion. It’s time to add a stylish streak to your nails with the new Stamping Nail Art.


Doing this nail art is quite simple. First you need to have the products needed for this nail art which mainly include nail colors, stamp, image plate and scrapper. Konad is one of the popular brands which deal in nail art products. Log on to www.khoobsurati.com  to buy exclusive nail art products. 


How to apply this art?


1. Choose the Right Color Combo: People choose various colors for nail art. Some unique color combinations like the pair of black and white may go well with any dress code. But nothing is compulsory when the choice is yours. Pick a pair of color which best suits your looks and best matches with your dress code. 

2. Everything on Nail!!!Nothing on Skin!!! : The nail colors which are specifically made for nail art are thicker than the ordinary nail polish. It is hard to remove once it sticks to your skin. Obviously you don’t want that to happen while you’re applying your nail art. So keep skin areas around your nail covered with a cello tape.


Nail Art
Nail Paints


3. Apply a Basecoat: You can take any color from the nail color combination which you have chosen. Apply a single coat of that color on your nail. This forms the base coat on which you’re going to stamp the design. Do not use ordinary nail polish for base coat because it is thinner than nail art color and will not be able to retain the design.

4. Prepare the design: You already have an image plate. Make sure it has the pattern of the design of your choice. Apply the special nail art nail paint on the plate. Scrape the plate using a scrapper so that the color spreads evenly on the plate and extra color is removed.


STAMPING PLATES FOR NAIL ART

5. Place the design on your nail: Once the image plate is ready with the right proportion of color, take the stamp and press the plate with it. The stamp is now ready with the design. Place the stamp on your nail and press it. This makes a design on your nail. Your nail art is now ready. Do the same with all the nails


Link for nail art videos to make you understand the procedure more is given below.


You can easily apply this nail art to your nails. You learn something better when you see someone doing it, right?  Visit khoobsurati studio channel on Youtube to check out exclusive stamping nail art videos. 

Red & White Bow Nail Art


You can watch this video & learn to do this amazing Nail Art:


Hope you enjoyed it!! Keep learning...by visiting   KHOOBSURATI STUDIO


Monday, 20 May 2013

The Sweet Strawberry Nail Art Design


Do you like strawberries? 


I just LOVE them. With the sun shining brighter by the day, why don’t you add a fresh and juicy touch to your looks! Now, here’s a super fun nail art for this summer that you can try. Even if you are new to the nail art world, this one is just the thing you need to begin with. You don’t have to be a pro to get your hands on this design. It’s easy breezy!

Why don’t we chuck the same old red strawberry look and add a pinky flavour! This will create a contrast and add an ultra trendy finish. After all, looking super stylish is all we want.


Nail Art Designs
Strawberry Nail Art


Here’s how you can do it:

  • We are using two colours- deep red & dark pink for the base coat. Apply the deep red polish on alternative nails. Then, use the dark pink polish on the rest ones.
  •  Use a fine brush and make zig-zag lines at the bottom portion of your nail. Use green nail paint for this.
  • Now, fill the bottom portion in the green paint. This should be designed in a way to give it a proper strawberry-like look.
  • If you are not too sure whether you can draw the zig-zag line free handedly or not, you can use a tape. Take a strip of tape and cut it into zig-zag lines. You can either go for straight lines or add curves to the bottom. You will be amazed by the way it turns out.
  • Now, for the final stroke, apply white colour nail varnish and create some extended dots (as shown in the pic). This gives the final cute strawberry feel to the nail art.
  • Repeat the same procedure on all the nails. You can create same straight lines on all the nails or go for different curves on each nail. But, be careful not to overdo it and ruin the strawberry look.

The dual colour approach, I order to design the strawberries, adds the super glam quotient to this nail art. A super cool match for the season and perfect start for beginners!